Saturday, April 30, 2011
Working on Mistress, My Yamaha V-Star 1100 Classic
Saturday, December 11, 2010
The Carnage to Mistress
Saturday, June 27, 2009
Kuryakyn X-Tension Highway Peg Mount Review
Kuryakyn X-Tension Highway Peg Mount ReviewOne of the first modifications I did to my V-Star 1100 Classic “Mistress” was to add some front pegs. At 6’2” I needed a way to stretch out my legs on longer rides. I had really wanted to get some Lindby Custom Linbars, still do, but funds were not available. So I started looking at front pegs to add to my bike to stretch out and rest my tired dogs on.
The Kuryakyn X-Tension Highway Peg Mounts measure 4 ½” long and have a 1 ¼” offset which allows the reach adjustment to be fine tuned for the rider. The metal is really stout and fully chromed. Another feature I really liked was that the actual foot landing pad is thicker on these pegs, not being just a post. This gives the foot more purchase area. The pad is also equipped with floating rubber grip strips. These peg mounts allow for the peg to be folded up when not in use.
Installation is straight forward and required no special tools, just normal SAE sockets or wrenches most folks have in their garage. Here we go again with SAE nuts and bolts for a metric bike. I mounted them right onto the front frame down-tubes. They have to be mounted high enough up that they do not interfere with the operation of the rear brake pedal on the right side and the shifter on the left. Do not forget to use the included locking washers.
Having an extra place to put your feet on long ride is well worth it. With my backrest on the Corbin seat and my feet up I feel like I am riding a recliner down the freeway. You can use the pegs with the toe or heel of your shoe or boot. Alternatively, you can just rest the whole back of your foot up on top of the peg. This gives you multiple choices on long rides when you need to move around for comfort.
I have not had any issues with the Kuryakyn X-Tension Highway Peg Mounts. I will warn you Chromaholics that it is painstaking to clean the tops of the pegs between the rubber traction inserts. I have found the easiest way is to use the very edge of a soft cleaning towel. You have to go back and forth like you are shining shoes, between the rubber inserts. Torch gives the Kuryakyn X-Tension Highway Peg Mounts a M.M.M. rating of 9.5.
Ride on,
Torch
Sunday, March 22, 2009
Stebel Nautilus Compact Dual Tone Horn

One of the items on my Christmas list last year was a Stebel Nautilus Compact Dual Tone Horn for my 2003 V-Star 1100 Classic, named Mistress. Oh, did I mention they come in chrome? When Christmas came around my dear wife informed me she had ordered the horn I wanted and an installation kit to go with it. I could hardly wait for it to come in.
It came in the next week. I learned that my wife had ordered the Stebel Nautilus Compact Dual Tone Air Horn from Twisted Throttle. She also had ordered their Plug-N-Play wiring
installation kit. I checked to make sure everything was there, and it was. The Horn itself came with a relay, one mounting bolt, one mounting nut, one mounting bracket adapter for mounting the horn separate from the small air pump, and directions. Twisted Throttles wiring kit came with, pre-wired relay connector, horn ground wire, two blue Posi-Lock connectors, one 30 amp ATC fuse, one six inch wire tie, six four inch wire ties, wiring directions and electrical schematic.I decided to install the horn when I replaced the battery on my V-Star. I started by removing my Corbin Dual Tourer seat. That is accomplished by removing both seat lean backs and the nut and washers at the rear of the seat. Then I lifted the seat assembly up from the rear while pulling the assembly rearward unhooking it from the seat holders. I made sure the fuel valve was turned to the off position, removed the fuel line, and disconnected the wiring harness going to the instrument cluster, removed the two bolts from the fuel tank bracket, removed the front ignitor unit panel quick fastener and removed the fuel tank.
With those out of the way I removed the battery side cover, disconnected the negative battery cable and then the positive cable. I went on and replaced the battery which you do not have to remove to install the Stebel Nautilus Compact Dual Tone Air Horn. I opened the wiring harness and horn packages and spread everything out ready for the install.
First I installed the relay and fuse into the wiring harness setting the relay part of the harness near where I would be mounting it under the seat. I routed the red power wire down to the battery positive cable area ready to hook up. I snaked the black and blue wires, which come twisted together, from the relay along the factory wiring harness route up to where the Original Equipment horn is located. I had previously replaced the OEM horn with a Fiamm Freeway Blaster Horn.
This is where I deviated from the instructions that came with the wiring kit. I wanted to keep the Fiamm Freeway Blaster horn hooked up so I could use both the Fiamm and the Stebel Nautilus Compact at the same time. I accomplished this by employing two Quick Splice connectors that I had on hand in my electrical supplies. I attached one to the positive, and one to the negative OEM horn wires. These simply crimp connect onto the wire using pliers. The center of the connector pinches through the wires insulation making the connection for the attached female lug. This made easy hook ups for the wiring kits male spades on the black and blue wires, blue to the positive brown horn wire and black to the negative pink horn wire.
Next I snaked the yellow wires from the relay along the factory harness under the fuel tank area and down to where I was going to mount the Stebel Horn by the rear brake master cylinder. Now it was time to mount the horn assembly itself. I had picked up a scrap piece of bracket and now needed to tweak it into the correct shape and make the mounting hole for the horn larger to fit the bolt that came with the horn.
I held the metal and horn up together where I wanted to mount the horn assembly next to the rear brake master cylinder to check clearances and get some idea where to bend the bracket. I then bent the metal bracket and re checked clearances. That done, I drilled out the hole in the end where the bolt from the horn assembly would go. The other end already had a hole to mount to the rear brake master cylinder bracket. I then removed the brake master cylinder mounting bolt and added in the new horn bracket and horn ground lead supplied by the wiring kit, and reinstalled.
Now that I had the new horn mounting bracket in place I attached the Stebel Horn assembly to it using the supplied mounting bolt and nut, making sure the horn was mounted in the correct orientation and angle as per the instructions. I hooked up the yellow power wire from the relay to the Stebel Horn power connector. Next, I connected the negative black wire from the ground at the rear brake master cylinder and the just added horn bracket, to the negative connector of the Stebel Horn.
I finished up installing the new battery by connecting all the positive leads and then the negative leads. I attached the Stebel Horn relay to the frame using a tie strap. I reinstalled the fuel tank and reconnected the electrical harness. It was time to test the horn before I put everything back together on the bike. I turned the key to the on position and hit the horn button. There was a slight delay after hitting the horn button from when the Fiamm Freeway Blaster starts and the Stebel Nautilus Compact Dual Horn kicks in. It takes a split second for the Nautilus’s air pump to get pressure to the horn. It’s worth the wait.
The Stebel Nautilus Compact Dual Tone Horn is loud. It is rated at 139 decibels and I believe it’s every bit of that. It is way louder than the Fiamm Freeway Blaster. It sounds like an 18 wheelers horn. Here is an excerpt from the Twisted Throttle website:
“Keep this in mind: sound energy doubles for every 3 points you go up in the decibel scale. It means that the Stebel Nautilus horn, which produces 139 dB of sound, puts out a LOT more sound than these popular horns: - 800% of the sound energy of the more expensive 130dB FIAMM Freeway Blaster; - 600% louder than the $140, 130 dB Pro Pad Mini Beast horn; - 650% louder than the $179, 128dB Rivco dual trumpet horn.”
Lastly I used the supplied wire ties to secure all loose wiring out of the way. I buttoned up the bike in reverse order of the disassembly and got it ready again to ride.

Just the other day I had the opportunity to use the Nautilus Compact Air Horn. It was on my commute home westbound on SH183 around Hurst Texas. A vehicle whose driver was not paying attention, was unaware or uncaring started drifting over from the center lane into the fast lane while I was in it. I guess even with his window down he could not hear my
The Nautilus Horn worked as designed and I was very happy with how loud it is above the sounds of the traffic. The installation on my V-Star 1100 Classic was not that complicated. It can be installed by someone with an average mechanical ability and electrical aptitude. Torch gives the Stebel Nautilus Compact Dual Tone Air Horn a M.M.M. Rating of 9 out of 10.
Ride on,
Torch
Tuesday, March 17, 2009
Attack of the U.F.M.

It all started on a sleepy autumn morning. I rode to work early, usually getting up around 4:30 – 4:40 am and left around 5:00 – 5:10 am. Needless to say I’m usually only partially awake at that time in the morning. I don my leathers and head out to the garage.
I opened the garage door and backed Mistress, my V-Star1100 Classic, out and got the rest of my gear on, gloves, face mask, clear riding glasses, and half helmet. I tucked my lunch inside my right saddlebag. It was cold enough outside that I had trouble keeping the glasses from fogging up when I breathed out my nose. I closed the garage door and proceeded to start the bike.
First I turned the ignition key all the way on. I made sure the choke, (fuel enrichment knob), was turned all the way on. Then, I made sure the fuel cut off valve was turned down to the on position remembering that if I do not turn the fuel knob back on, I will not make it out of my neighborhood with out running out of fuel and stalling the bike. Don’t ask me how I know. I pressed the cut of switch to the run position and hit the start button.
Mistress’s 1100 V-Twin roared to life. With the Cobra exhaust, you can bet my neighbors know when I leave in the morning. I slid the fuel enrichment knob, (works like a choke), over to idle her down some and headed carefully out of my driveway onto the dark, damp streets.
It was a cold, dark and foggy Monday morning. I turned out of my neighbor hood and headed eastbound on Cheek Sparger Road. I straightened out from the turn and started to accelerate. Just then, I caught some movement just barely visible at the far reaches of the headlamp and riding lights off the side of the road. At first I didn’t pay to much attention to it, thinking it’s probably just a rabbit on the side of the road hopping around.
Then I noticed the anomaly is headed perpendicularly to my track on the road and will cross right in front of me. That’s when I spotted the glowing white beady eyes of this creature fixated on my Mistress and myself, reflected from the lights. As I got closer I could make out its size. It was larger than an alley cat and more like the size of a small dog. Now I could make out some large teeth and huge fangs in a pointy snout and large whiskers with foam trailing out the corners of its mouth.
Just then I realized what the Unidentified Flying Marsupial was. It was a very angry opossum running at full gallop across the road and headed straight for me. It looked like it was out for blood. For all I knew it could be rabid. I raised the angle on my right wrist and Mistress responded by slowing down some, both of us hoping to throw the attackers timing off. I just new it was going to either try to get up underneath my front tire and knock me off my bike or just jump straight up for a death grip on my throat.

My change in speed to throw off the timing ploy did not work. My next tactic was to aim my V-Star 1100 right at it. Mistress nodded in agreement. The logic in this approach was that, if I tried to hit a moving target, more than likely I would fail. The gargantuan opossum was at a full out run and just fixing to spring at me, its claws glistened in the riding lamps, when its head hit my front tire. It made a hollow thump type sound.
At this point neither one of us could adjust the momentum we had built up. The killer slid underneath the path of the bike. I could feel the rear of the bike lift up as the rear tire ran over the marsupials head. I knew it was its head because if it had been its body the back end of the motorcycle would have bounced up a lot higher.
In a flash it was over. Mistress and I had thwarted a deadly attack from a killer opossum and barely survived. I tried to glance back behind me and saw nothing on the roadway. But it was foggy and dark so I might not have been able to see it. I called my wife when I got to work and asked her if she had seen anything in the road, she leaves for work right after me, she had not. I looked closely again at the scene of the assault on my way home and saw nothing. The Attacker had made a clean get away.
Opossums are the other brown meat and tastes like chicken, I would imagine. Otherwise, they can be just another large, rodent looking, Unidentified Flying Marsupial obstacle in the road. Most of the time, you only get to see them with their little feet sticking up stiffly. Yep, they are just another obstacle you have to watch out for while riding a motorcycle in the Texas suburbs.
What is the moral of this story? Be prepared at any time, any place, and any conditions to react to changes in road conditions or obstacles in your path. Also remember, not all obstacles hold still for you. Sometimes obstacles have a mind of their own.Ride on,
Torch
Saturday, March 14, 2009
A Tale Of Two Batteries

Mistress, my ’03 V-Star was whispering in my ear. Not literally of course, but she had been getting a little slower to crank in the morning. Being in the automotive industry I recognized the symptoms. The battery was getting weak. Being the professional procrastinator that I am, I ignored her. I did start plugging her into the Battery Tender Jr. on the weekends to make sure she would start for Monday morning commutes.
Then finally it happened one day after work. It went down on a day a cold front had blown in. I went out, hopped on her and hit the start button. Nothing happened. She whispered, “I told you...” I pondered my predicament a few minutes and called my wife to send one of the boys to come pick me up in our ’98 Ford Explorer. That was embarrassing. All leathered up and my bike just wouldn’t budge. I could have jumped her off but it was just much easier to call for a ride.
The next morning I grabbed an extension cord and my Battery Tender and had my wife drop me off. Fortunately, my workplace was on her way anyway. I connected her up to let the battery be tended to and came back on lunch break to see if she would start. She did. I left the tender on until I got off work. After work the mighty 100 V-Twin roared to life and I was headed home.
OK, here is the dumb part. Any smart individual would have checked the electrical system out and/or replaced the battery then. I have never claimed to be smart. I just left it on the Battery Tender all the time at home now. I milked that old battery along like that for another month to a month and a half. I had no idea how old that battery was or how long it had been in my V-Star.
Then it happened again. It was my night to work late and a cold one at that. I got bundled up to go home and, “Click”, nothing. Another phone call and another ride home in a cage.
The next morning I repeated the battery tender procedure and rode her home. I was determined to get another battery this time.
The first place I referenced about V-Star 1100 batteries was the V-Star 1100 Riders Knowledge Base. The Knowledge Base has a wealth of information and answers to just about any question V-Star related, including some questions that haven’t even been asked yet. It had a whole section on batteries. I read you could get a larger size battery that would fit. The stock battery on a V-Star is the YT14-B4 rated at 12 Amp Hours and 135 Cold Cranking Amps. A good replacement for it is the YT14-BS rated at 12 Amp Hours and 200 Cold Cranking Amps and is only 11/16” wider. That sounded like what I wanted, so I started searching for one. Somehow I overlooked the, “Batteries Plus (local source) - $49.99 -Charlottesville, Va on 2/6/06”, Partly because I had never heard of them.
I found what I was looking for at CBXMAN Motorcycles. It was a Binetto YTX14-BS High Performance AGM ATV/Motorcycle Battery. I ordered it and a balaclava and waited patiently. CBXMAN shipped my order right out and I was able to watch the shipping progress online at the shipping companies web site.

The order arrived a week later and I opened the package and removed the instructions for the battery. The Binetto battery came with very vague and sparse directions. What’s a guy to do with out pictures? They ship the battery dry and you have to install the acid and charge the battery before use. I decided to wait until Saturday afternoon to install the battery. I was scheduled to work a half day and would do it after lunch.
Saturday afternoon came around and I figured out how to open all the battery acid vials and pour them simultaneously into the six separate openings. When all the acid was in I hooked it up to my Battery Tender Jr. After it had charged for a while I topped it off with a little water. This turned out to be a mistake later on. I know, I know, you are supposed to use distilled water anyway. When the Battery Tender’s light turned green I knew it was time to install it on the bike.
Battery replacement on a V-Star is fairly simple. Remove the battery cover by unscrewing it’s hex bolt, unfasten the rubber strap that holds the battery in from the bottom, disconnect the negative battery cable and any other grounding cables attached to the negative post, then remove the positive cable and any other power cables attached to the positive post.
Installation is the exact reverse. I noticed that the Binetto battery posts were not that great of quality. The posts set too low in the battery. This made it hard to install round terminals on the front side of the post without distorting or bending the eyelets. The battery did fit fine into the battery opening space on the bike. However, the battery on a V-Star does not fit level; it sets at an angle with the right side, the negative side, higher than the left. This is where the topping off of the battery became a problem. All the excess acid when the battery was tilted came out he vent hole. I had to keep hosing it off the bike with the garden hose to keep the acid off the bike.
I got the motorcycle all put back together and tested the battery by starting the bike and it started up with no squabbles. I gave her a quick bath and ran her down to the gas station for a quick feeding. It started and ran fine for one week and then the dreaded no crank happened once again, this time in the morning before my ride to work. On top of that one of my garage door hinges had broken and I had to leave her outside until I could repair the garage door.
A few days later I went back the V-Star 1100 Riders Knowledge Base and printed out the PDF files on how to check the rectifier-regulator and stator in the charging system. I did al the checks and everything on the motorcycle passed the tests. I came to the conclusion that my new Binetto battery was defective. A coworker and fellow rider, Danny heard of my predicament and suggested a store near his home called Batteries Plus.
I called a local Interstate battery store and they had one but it was another one that you had to add the acid too, or “acis” as the typo on there website says. The Interstate battery was pretty pricey also and I believe it only came with a six month warranty.

Next I called Batteries Plus on Davis Boulevard in North Richland Hills Texas. I spoke with Robert, a helpful and knowledgeable counter person, who checked to see if they had an Xtreme battery in stock the size I needed. They did not have one but they would have a stock order of them in a couple of days. I asked if they were a sealed battery and he said they were. Then Robert checked to see if they had an X2-14 Xtreme battery the size I wanted in stock. They did have one. However, they did cost a little more. He explained that the X2 battery comes with a two year warranty instead of just one. I told him I would be by after work to pick one up. Browsing around their website I found a ten percent off coupon.
I also fired off an email inquiry to Yamaha Suzuki of Texas in Hurst from their website about the cost and availability of a battery, which they have not responded to, to this day.
After work I headed straight to Batteries Plus and met Robert. He grabbed the battery off the shelf for me, it was on display, put it back in its box making sure all of the hardware was there. It came with two height adapters and two spacers and bolts for side mount cable installations. I presented my 10% off coupon and Robert said they have a 20% off coupon that comes out in the paper and he would give that to me. I was not just pleasantly surprised; I was shocked at the offer and his dedication to customer service. Trust me; I will refer anyone looking for a battery for anything to check out Batteries Plus. If you live in the D/FW area, see Robert at the North Richland Hills location.
Here is the X2-14 Xtreme Battery description from the Batteries Plus website:
Choose an X2 battery to keep you powered. Designed for the vibration in an ATV and the endurance of a touring bike. X2 batteries offer the best features; fully sealed - maintenance free, pure calcium-lead plate design for increased power, easy to install with front mount threaded terminals and extended reserve power for more accessories. Backed by a full 24 month warranty, the X2 is the perfomance battery you have been seeking. The X2-14 has specific dimensions of 5.88" x 3.44" x 5.75".
I went home and installed it that evening. (The Binetto battery would not even crank the V-Star over after being on the Battery Tender for nearly a week now.) The installation of the X2 was much easier. The whole battery had a more professional fit and finish. The posts had plenty of clearance for the terminals and the height adapters, spacers and bolts were not needed on the V-Star installation. I did not even have to charge the battery to start the bike, it came fully charged.
The failure of the Binetto battery may have been caused by me and its lack of clear directions, I do not know. It was an expensive lesson to learn. There are some things that it is just better to purchase locally rather than online. And, you get what you pay for; some things are inexpensive for a reason. My Mistress has not been complaining to me since the X2 Xtreme Battery was put in several weeks ago and she has been starting every time I ask. On a scale of 1-10, Torch gives the X2 a M.M.M. Rating of 9.5.
Ride on,
Torch
Wednesday, February 18, 2009
Fiamm Freeway Blaster Horn Installation & Review

Before I started using my ’03 Yamaha V-Star 1100, I wanted to give her a good "T-CLOCS" inspection. I learned about the "T-Clocks" pre-ride checklist when I took the Motorcycle Safety Foundations Basic Riders Course. You can download your own "T-CLOCS" checklist to print and use here.
C-Controls
L-Lights
O-Oil
C-Chassis
S-Stands
Not long after that I found myself in the local Pep Boys Auto store looking at replacement horns. I saw the Fiamm Freeway Blasters and grabbed a Low Note Horn. I figured the low note would give a larger sound, which was definitely what I wanted. I got home and read the simplistic directions. I also referenced the V-Star 1100 Riders Knowledge Base in the Horn section. It appeared that it was pretty much plug-n-play. Always remember, appearances can be deceiving. Your mileage may very, as they say.I went to the garage and started the install. The first thing was to remove the pathetic OEM horn. It had only one bolt attaching it to the upper frame between the down tubes. Once unbolted, I pulled the electrical connector off the OEM horn and it was now off the bike. That part was easy enough.
Torch
Saturday, February 14, 2009
My Mistress
My Mistress is my 
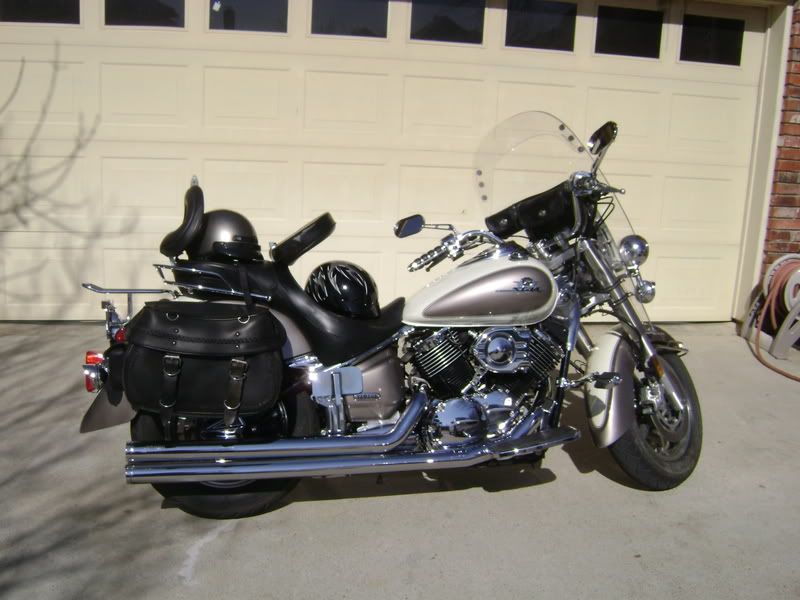
motorcycle. It was time to take stock of what all this bike had on her. I believe that I am the third owner and the previous owners had really decked her out. It was a 2003 Yamaha Star V-Star 1100 Classic with 26,000 miles on it. Although a Classic model, She looked more like a Silverado because of all the accessories. Every time I looked at it I discovered something new. I had been keeping a running tally of all the accessories for quite some time and here is the list as best as I can discern, not in any particular order: SS Customs Mid Range 420 Cam Kit (includes: Chubby Air Kit, Needles, and Jets)
Jardine Chrome Oil Filter Relocation Kit
Progressive Front Fork Springs
Progressive Rear Suspension Spring
Corbin Dual Touring Seat with Front & Rear Removable Backrests
Audiovox CCS100 Universal Vacuum Cruise Control
Kuryakyn Hypercharger for V-Star 1100 (vacuum is hooked up, but just for looks)
Kuryakyn ISO Grips
Kewl Metal Kewlock Grip End Helmet Locks
Star Motorcycles Floorboards with Heel & Toe Shifter
Kuryakyn Chrome Floorboard Covers
Star Motorcycles Billet Brake Brake Pedal Cover
Star Motorcycles Rear Luggage Rack
Barons Customs Sport Board Adjustable Passenger Floorboards
Star Motorcycles front Light Bar
Star Motorcycles Headlamp, Front Passing, and Front and Rear Turn Signal Visors
Clear Alternatives Clear Front Turn Signal Lenses & Amber Bulbs
Clear Alternatives Smoke Rear Turn Signal Lenses
Radiantz LED Rear Turn Signal Conversion Kit
Kuryakyn 7" Halogen Headlight Wave Cut Tri-bar with Black Dot
Kuryakyn Chrome Brake Master Cylinder Cap
Chrome Rear Brake Fluid Reservoir Cover
Kuryakyn Magnum Plus Mirrors
Kuryakyn Billet Chrome State Inspection Plate
Cobra Speedster Longs Exhaust
Memphis Shades Windshield
Memphis Shades Lowers
Laminar Lip on Windshield
Leather Three Pocket Windshield Bag With Braiding
Star Motorcycles Front Fender Trim Bumper
Custom Classic Hard Leather Bolt On Saddle Bags with Braid & Pocket
Easy Brackets Saddle Bag Quick Detachable Brackets.
Kuryakyn Chrome Neck Covers
Clocks 4 Bikes Chrome Handlebar Clock, Original Mount with White Faceplate
Clocks 4 Bikes Chrome Handlebar Thermometer, Original Mount with White Faceplate
Kuryakyn Chrome Mid-Frame Cover
Kuryakyn Lighted License Plate Frame
Kuryakyn Chrome Boomerang Frame Trim
Kuryakyn Chrome Handlebar Control Covers
Show Chrome Celestar Rear Brake Master Cylinder Cover
Kuryakyn Phantom Swingarm Chrome Cover
Avon Venom-R Tyres
Here is the list of things I have added or upgraded since I purchased her:
Replaced the OEM horn with a Black Fiamm Freeway Blaster Low Note Horn
Binetto YTX14-BS High Performance AGM ATV/Motorcycle Battery
Stebel Nautilus Compact Chrome Air Horn
Kuryakyn X-Tension Pegs
Replaced front Avon Venom-R Tyre with Metzler ME 880 Marathon
Replaced worn/missing Star Motorcycle Billet Brake Pedal Cover Rubber Inserts
Replaced one Cobra Dragster Long Exhaust tip, lost while riding
Battery Tender Connector to battery for Battery Tender Jr.
I will be writing reviews and stories of these projects and upgrades in the future. I will also be reviewing the riding gear I have picked up and used along the way.
Ride on,
Torch


